Showing posts with label Project Quilting. Show all posts

Tuesday, March 29, 2011

Sugary Sweet Baby Quilt

Voting is up for the last entry for this season's Project Quilting challenges!  This is my Sugary Sweet Baby Quilt.  The challenge involved using a large print fabric, and at least one stripe or plaid fabric.  I chose to use large prints in several ways.  First I used the big focus print as a large section of the quilt, just a little off centered.

Then I used some small and large prints in the pieced nine patch blocks that I then cut on a slant using the X-Block ruler.  I like the movement that the tilted nine patch blocks give to the piece, and the little pinwheel effect that is made where the blocks come together :)

I also cut a larger print up to make the narrow pink sashing strips; and the bright yellow binding is also a large print.  The striped fabric I used as accent sashing strips on either side of the large print.  

Go on over to Kim's blog to check out all of the other Large Print entries and to vote.  Leave a comment to be in the running for a cute little fabric bear for the giveaway!

Enjoy the day!
~ Dawn

Monday, March 14, 2011

The Geese of Gettysburg

Ok, I did go "out of my box" for this week's Project Quilting entry.  The criteria for this challenge was to use a traditional Flying Geese block as inspiration but to do something different with it.  I wanted to try the curved Flying Geese that I've seen in some art quilts at shows, but I'd never made them before, so this attempt was completely different for me.  And while I'm most comfortable with reproductions, home-spuns, and some brighter cottons, I rarely use batiks ~ which I used here to piece the background. 

I wanted the geese to curve and graduate in size, so I figured that paper piecing would be the way to go with this.   I drew out my curves and drafted the geese in a larger "life size" form, and then traced the geese unit in four sections to make them easier to handle. 

Then I paper pieced the geese, and sewed the units together.  

Since my first love is hand applique, that's how I decided to attach my geese to my background.  I basted under the edges, appliqued it in place, and then cut away the background from behind and removed the paper backing from the geese. 

The other criteria of the challenge was to use two complimentary colors on the color wheel in our piece.  I used 13 different shades of blue and orange to compose the flying geese, graduating the shades from dark to light to dark again.  Blue and orange because my inspiration for the project are the geese that converged on my daughter's college campus every year at Gettysburg College ~ and blue and orange are Gettysburg school colors.  After quilting, I stretched and mounted the quilt over a 16" x 20" artist canvas. 

The machine appliqued geese silhouettes in a smoky brown color are to depict the actual geese roaming the campus around my daughter's dorm ~ thus the title of the piece...The Geese of Gettysburg.  Although with that title I feel like it needs a cannon silhouette or something ~ I'm not sure I've ever seen a Gettysburg inspired quilt that wasn't done in Civil War Reproduction fabrics :)

The voting is up now for this week's Project Quilting challenge and you can go here to cast your vote for your favorite entry.  It's really cool to see what everyone comes up with, and to read what their inspirations were.  Don't forget to leave a comment to be entered in the give away too!

Enjoy the day!
~ Dawn

Tuesday, February 15, 2011

Puppy Love

It never fails, just when I have a busy week with lots of deadlines looming, that's when I tend to get sick.  Well that's what happened last week.  With a week already full with things to do, I decided that Wednesday night I needed to make it more interesting by starting to come down with the flu.  Luckily I had picked a design for my Project Quilting project that was not too complicated, and I was able to finish it by Friday before I really became worthless for the rest of the weekend. 

The challenge was to go for a Valentine theme without it being overtly pink/red.  Right away I came up with "Puppy Love", a quilt that can hang on a door, or the wall in a mud room, that has plenty of pockets for holding all of those dog supplies that need to be kept together and handy when needed, but up and out of the way when not.

I like to make quilts that are functional and this one has four square pockets are made of wool for nice texture and sturdiness, then two larger pockets that are made of cotton, and sectioned off.  

Along with wool appliques, I embellished it with cute twill ribbon with paw prints and dog bones,

and the little stacked heart/flower wool embellishment that I made the other day ended up here :)

The Project Quilting voting is up now.  Go Here and check out all of the wonderfully creative entries, I'm always in awe of what everyone comes up with ~ and make sure you leave a comment to be entered in the give away!

Enjoy the day!
~ Dawn

Friday, January 28, 2011

Laurel

The Project Quilting topic for this week was to design a quilt inspired by the name of a town.  My inspiration for this challenge was Laurel, Maryland.  When I was born my family lived in Laurel, a little town where my dad (and also his mother before him) was born and raised.  I knew right away I wanted to do something with a Laurel flower. 

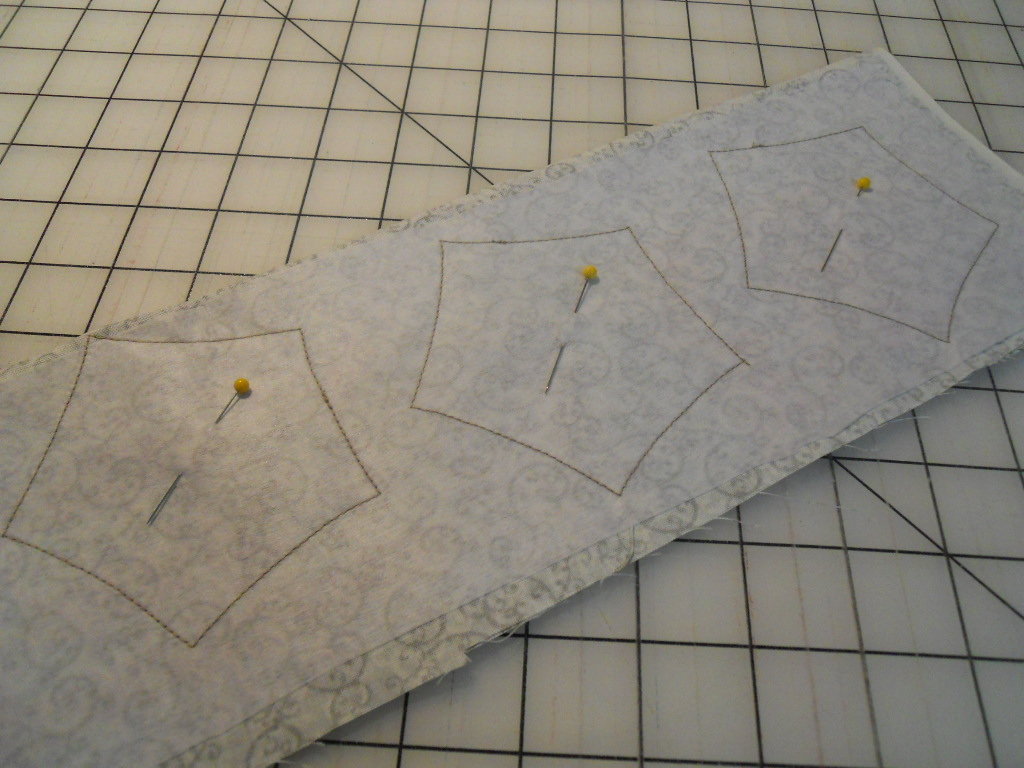
 I used a picture of the flower to design a stylized three-dimensional version of this pentagon shaped flower. 

To make the flowers, I layered two pieces of white print fabric right sides together, ironed a thin fusible interfacing to the back side, and marked pentagon shapes on the interfacing.  I sewed around the shapes on the line and cut them out just outside the line.  

I made a small clip on the back fabric, and turned them right side out and pressed. 

Then I sewed several small pleats into each flower to give it some shape.  

I attached the flowers to a darker background fabric so they would stand out, placed a small peach colored fabric circle in the center of each flower,  and strung green seed beads when sewing each flower to the quilt.  Then I frayed the edges of the peach center a little. 

The leaves were made by pieceing two strips of green fabrics together and then cutting out my leaves from that.  They were fused on and then blanket stitched around the edges. 

The quilting was done with an all over meander in a clear mono-filament thead to go well over the color changes of the lattice style borders. 

So this is my Project Quilting Challenge 2 project...Laurel ~ and it's making me wish for Spring while making it on these last few snowy days :)

Enjoy the day!
~ Dawn

Monday, January 17, 2011

It'll be Awesome

It'll be Awesome!  That's my new favorite quote, stolen from Heather who says it a lot ~ although sometimes she's saying it sarcastically ~ it's my mantra for the start of 2011 :)  When I saw the theme was primary colors for the first challenge of Project Quilting, I knew that I had to make a project using this quote, and I decided a large 20 inch quilted cushion or pillow would be fun.  

The guildlines of the challenge were as follows:
1. Use one 6" square of each primary color red, yellow, and blue
2. You may cut each square into no more than 4 pieces
3. You must use the entire 6" square of each primary color on the front of your project.
4. You may add any other fabrics or materials.

I cut mine into four 3 inch squares each...

...and I added some more bright happy colors to go along with them combined with a white background.  I sewed some of the 3 inch squares together to make color block stripes across the front of my pillow and I saved the rest to make prairie points (more on that later)

I used some scraps of fabric to string piece sections to cut into circles for some stylized accents, and I fused and machine blanket stitched them along with the letters for the word "Awesome".

The piece is machine quilted with an all over meander, and the words "It'll be" are hand quilted with blue 12 weight thread in a long stitch style. 

Now back to those prairie points for the edges.  I get asked often how to make prairie points, so here you go:  Fold a square (in this case 3 inches) in half point to point to make a triangle and press with a hot iron. 

Then fold it again, and press it again ~ I use a squirt of starch or sizing at this press to help hold the shape while you work with it.  Voila, you have a prairie point!

Working on just one side at a time, line them up along the edge of the front, having each prairie point "eat" the next one with an overlap of about a quarter of an inch.  Don't over think this ~ it's not rocket science, if someone ever tells you your prairie points aren't even, then don't let them use your pillow! 

None of these measurements have to be exact, (unless you plan to enter in a major juried quilt show), for this type of project it's ok to just play with the placement and color arrangement a little and then pin them in place (I use one pin for each prairie point). 

Sew with a scant quarter inch seam allowance to hold them in place.  Tip: use a seam ripper or stiletto to stabilize the overlap spot as you approach and sew it. 

Then I added an envelope style back to it as with any pillow, turned it right side out, pulled all the points completly out, and added a pillow form.  Now it's sitting on the little bed in my sewing room making me happy every time I enter ~ and the pillow cover is now for sale in my etsy store :)

To view all of the Challenge One projects for the kick off of Project Quilting Season Two, check out Kim's blog.  While you're there, cast a vote for your favorite, and leave a comment to be entered in a give away!

Enjoy the day!
~ Dawn

Monday, January 10, 2011

Project Quilting Season Two Begins!

Tonight I was browsing the blogs that I read, and what popped up, but a picture of my Logs quilt on Kim's Fabric Fascination blog :)  Kim was announcing the beginning of Season 2 of Project Quilting that just started yesterday.  I have an idea of a project that I'd like to make by the deadline of noon on this coming Sunday, but we'll see if I can get to it as I have a couple of other deadlines that I'm working on this week as well.
 
Season One of Project Quilting was a blast.  This is a collage from Kim's Crafty Apple consisting of one project from each of the 25 people who participated in Season One.  You can find it, and more information on Project Quilting and Season Two here on Kim's Crafty Apple blog.  There is still plenty of time to get in on this week's challenge...and if you can participate in any of the challenges, I strongly recommend it ~ I found the challenge to be really fun and a cool way to spark creativity.  I can't wait to see what everyone comes up with this season :)

Enjoy the day!
~ Dawn
 

Monday, December 13, 2010

I Was Interviewed :)

I was interviewed by Kim's Crafty Apple as a participant in Season One of Project Quilting!  You can check out the interview here on Kim's Blog.  The above montage are the projects I made in the first season.  Thanks Kim for such a cool feature!
Stay tuned ~ Season 2 of Project Quilting begins January 9th...and anyone can participate, consider joining in on the fun!

Enjoy the day!
~ Dawn

Wednesday, August 25, 2010

Goodies in the Mail

I got a sweet box in the mail today.  I love these shipments, it feels just like Christmas!  I'm going to be working on a project that I can't show you right now, but it will hopefully be out around the first of the year.  These yummy fabrics are from the American Heritage collection from Benartex Fabrics.  I have been busy lately, just haven't been able to show anything.  Hopefully some of the fruits of my labors can be made public soon!

And these are the other 8 Project Quilting entries for this week along with my little Miss Muffet quilt (second row, third column).  In case you missed it, the inspiration theme is Nursery Rhymes, and all of the projects this time are so creative!  Don't forget to go over to Kim's blog and cast your vote before Sunday afternoon.  This is the last challenge for this season, so leave a comment for a chance at a giveaway!   

Enjoy the day!
~ Dawn

Monday, August 23, 2010

Fear Not Little One

I finished my last Project Quilting piece on time for the challenge this week.  That doesn't sound like a great feat, but I had tons of deadlines to meet in this catch-up week and wasn't sure I'd get to even participate.  The inspiration for this week was Nursery Rhymes.  I made a small collage art quilt using a vintage storybook picture of Little Miss Muffet, and added wool, ribbons, lace, ric rac, buttons and other embellishments to dress it up.  All of it came from scraps and leftover pieces that I held on to from other projects, including the scrap of Printed Treasures fabric that I ran through the printer, so this little piece was quite a practice in re-use! 

I have lots of favorite Nursery Rhymes (My brothers and I always favored the stories and poems that rhymed when my mom read to us ~ so much so that Edition 10 of our antique Jr Editions set completely wore out from use).  I especially liked Nursery Rhymes that had something scary, so right away Little Miss Muffet came to mind.  This vintage storybook picture that I found on a free-to-use vintage clip art blog had the spider in the lower left hand corner, but no spider web, so I inked the web in myself.

The whole collage was set on a Spider Web Block background that measures 15" x 15".  I chose soft muted colors in vintage looking fabrics to coordinate with the feel of the antique storybook picture, and with a child's nursery decor in mind.  The piece was quilted with decorative stitching around the edges and on some of the trims, and the overall quilting was to add to the spider web feel.  I named it "Fear Not Little One" because I think that was the general theme of many of the Nursery Rhymes, and this one in particular.  

The voting poll is up now for the Nursery Rhyme challenge.  You can go to Kim's blog here to see the other entries and cast your vote ~ and leave a comment to be included in her giveaway!  This is the last "episode" of this season, and I've throughly enjoyed participating and being challenged to come up with a quilt idea and execute it in just one week.  There's going to be a little break, but Kim says there will be a season two, so be on the look out and think about participating, it's fun and that's what it's all about right :)

Enjoy the day!
~ Dawn

Sunday, August 8, 2010

A Yoyo Play Week

I'm continuing my week of Play here at Elsie's house (still no baby as yet).  For the Project Quilting Challenge this week, since I am away from home, I knew that if I participated it would be something I could do by hand...so I decided to make something with fabric yoyos.

The challenge parameters were to make something with black and white, and only one other color.  So after visiting the local Hancock Fabrics to pick up some fabrics and a Clover Large Yoyo Maker, I made a bunch of white with black, and black with white yoyos, and chose a cute lime green for my other color.

I sewed them into flower shapes...

Then I sewed the flowers together.

The only other parameter was that the finished project could not be a square or rectangle, so I made it into a diamond shaped candle mat (that's now available in my Etsy Shop!). 

Don't forget to go and vote for this week's Project Quilting Challenge here at Kim's blog.  The entries are getting more and more artistic every week, I'm in awe! 

Enjoy the day!
~ Dawn

Thursday, July 22, 2010

Inspiration From Where?

For the Project Quilting Challenge this week, I worked with castles and good fairies :)  I had this fabric left over from a bunk bed tent that I just made for Elsie for her upcoming birthday (I'll have pictures of that in August when I deliver it to her and we try to hang it on the bed).  Our challenge for this week was to take a trip to the office supply store for inspiration.

This is the pile of loot that I started with - page protectors, photo protectors, key tags, funky paperclips, a dry erase/magnet board, composition notebook, colored pencils, & stickers.

I added a tape measure that I already had, sewing it accross the tape in increments, so to leave some areas loose.

I stitched a plastic photo protector to the outside of the pocket before adding the pocket to the quilt.

This shows one of the funky shaped paper clips sewn on (you'll see why in a moment).  And for some sparkly embellishments, I fused together some Angelina Fibers to make little sheets and cut them into hearts and stars using my Accuquilt Go.
 
I also sewed on some fabric flowers that I had on hand and added button centers for some other fun embellishments.

I added little elastic bands in the center that will hold on the removable dry erase/magnetic white board, and this is what I had.  (This is the quilt before I loaded it up.)  It measures 20" x 40".

The pocket holds the coloring supplies and stickers.  I added a picture of Elsie feeding the giraffe at the zoo since that is one of her favorite memories so far.

The funky clips that I sewed on the top are to hold a page protector with Elsie's artwork (which is much better than mine by the way).

Here is how I used the key tags.  They are markers that can be written on to mark the child's height at a certain age or date.  They just clip on, but can be sewn or stapled on to be permanently attached.

So here is the finished Growth Chart/Art Center all loaded up with goodies.  The pocket could also hold books (and the markers and dry erase board can be removed and only given out when Elsie is being supervised, since this will hang within her reach in her bedroom).  I started the tape measure at 24", and the quilt has 2" borders, so it will hang 22" up from the floor.  Just the right height for a child.  This will look nice hanging in Elsie's bedroom, coordinating with her bed tent and other Pink things (she's turning 3, and that's currently her very favorite color).

This was a neat challenge, and just goes to show that you can find quilty inspiration just about anywhere! I went ahead and entered my Project Quilting challenge project early because I'm heading off to Quilt Odyssey in Hershey PA, so I'm sure I'll get some wonderful inspiration there too...along with the chocolate :)

Enjoy the day!
Dawn

PS ~ Don't forget to visit our new website! http://springwaterdesigns.com