Friday, January 28, 2011

Laurel

The Project Quilting topic for this week was to design a quilt inspired by the name of a town.  My inspiration for this challenge was Laurel, Maryland.  When I was born my family lived in Laurel, a little town where my dad (and also his mother before him) was born and raised.  I knew right away I wanted to do something with a Laurel flower. 

 I used a picture of the flower to design a stylized three-dimensional version of this pentagon shaped flower. 

To make the flowers, I layered two pieces of white print fabric right sides together, ironed a thin fusible interfacing to the back side, and marked pentagon shapes on the interfacing.  I sewed around the shapes on the line and cut them out just outside the line.  

I made a small clip on the back fabric, and turned them right side out and pressed. 

Then I sewed several small pleats into each flower to give it some shape.  

I attached the flowers to a darker background fabric so they would stand out, placed a small peach colored fabric circle in the center of each flower,  and strung green seed beads when sewing each flower to the quilt.  Then I frayed the edges of the peach center a little. 

The leaves were made by pieceing two strips of green fabrics together and then cutting out my leaves from that.  They were fused on and then blanket stitched around the edges. 

The quilting was done with an all over meander in a clear mono-filament thead to go well over the color changes of the lattice style borders. 

So this is my Project Quilting Challenge 2 project...Laurel ~ and it's making me wish for Spring while making it on these last few snowy days :)

Enjoy the day!
~ Dawn

Tuesday, January 25, 2011

Dreaming of Summer

While it's frigid outside, I'm thinking Summer!  This is a little sneaky peek of a project that I just shipped out in the mail for an upcoming magazine publication.  I love working on Summer quilts in the winter time ~ makes me feel a little warmer :)

It seems that everything I've been working on lately, I can't share fully yet ~ I have been quilting, honestly I have!

So since I don't have much to show today, I'll refer you to the fun blog hop that's going on right now.  The Accuquilt/Electric Quilt Challenge Blog Hop.  You can start at the beginning at SewCal Gal's blog, and follow the progression listed in her post for the rest of the week.  Fun ideas and designs will abound ~ so far I love the "Candy Bars and Cookies" project at SewCal Gal's site, and day two finds some cool EQ7 tips at Marjorie's Quilting Bee!  Check it out, more to come all week ~ and there just might be a really cool giveaway on Friday :)

Enjoy the day!
~ Dawn

Friday, January 21, 2011

Chutes & Ladders

I have more fun publication news ~ My Chutes & Ladders quilt is in Quilt Almanac 2011 out on the new stands now!  This is an easy quilt made with quick piecing methods, which makes it perfect to whip up as a gift for someone special.  And an added perk is it can be almost completely cut out on an Accuquilt Go!  My friend Mary of Keep Me In Quilts did the beautiful all over machine quilting on this one for me :)

Chutes & Ladders is a bed quilt measuring 61inches x 84 inches, and besides the obvious bedroom use, I think it would make a great dorm room quilt, or a wonderful generous throw in the TV room (I love to cuddle under a really big quilt when movie watching)!  It's made from the soothing blue and green collection from Paintbrush Studios call Oasis.

...And I have a limited number of kits available here on my website!  We also have some of the fabrics still on the bolts for those backings and coordinating pillows/projects (fabric yardage can be found here).

Speaking of pillows, the bonus throw pillow is being offered as a Free Pattern on the Quilt Magazine website :)
I'm so excited to have a design in Quilt Almanac as it's one of my favorite magazine editions, featuring quilt projects for all seasons of the year!  You can pick one up on most major news stands, but if you want to purchase the quilt kit, and can't find the magazine just let me know :)

Enjoy the day!
~ Dawn

Wednesday, January 19, 2011

It's Finished!

It's finished!  My block for the Baltimore Applique Society's reproduction of the Lady of Victory Quilt.  I've said it before, but I love this Red/Green style (not too fancy, kind of folk arty) of Baltimore Album block. 

And it's done, and turned in well before the deadline ~ it is a good day!  I'll share a photo of the whole quilt later this year when the blocks from all of the participants get put together into a quilt top :)

Enjoy the day!
~ Dawn

Monday, January 17, 2011

It'll be Awesome

It'll be Awesome!  That's my new favorite quote, stolen from Heather who says it a lot ~ although sometimes she's saying it sarcastically ~ it's my mantra for the start of 2011 :)  When I saw the theme was primary colors for the first challenge of Project Quilting, I knew that I had to make a project using this quote, and I decided a large 20 inch quilted cushion or pillow would be fun.  

The guildlines of the challenge were as follows:
1. Use one 6" square of each primary color red, yellow, and blue
2. You may cut each square into no more than 4 pieces
3. You must use the entire 6" square of each primary color on the front of your project.
4. You may add any other fabrics or materials.

I cut mine into four 3 inch squares each...

...and I added some more bright happy colors to go along with them combined with a white background.  I sewed some of the 3 inch squares together to make color block stripes across the front of my pillow and I saved the rest to make prairie points (more on that later)

I used some scraps of fabric to string piece sections to cut into circles for some stylized accents, and I fused and machine blanket stitched them along with the letters for the word "Awesome".

The piece is machine quilted with an all over meander, and the words "It'll be" are hand quilted with blue 12 weight thread in a long stitch style. 

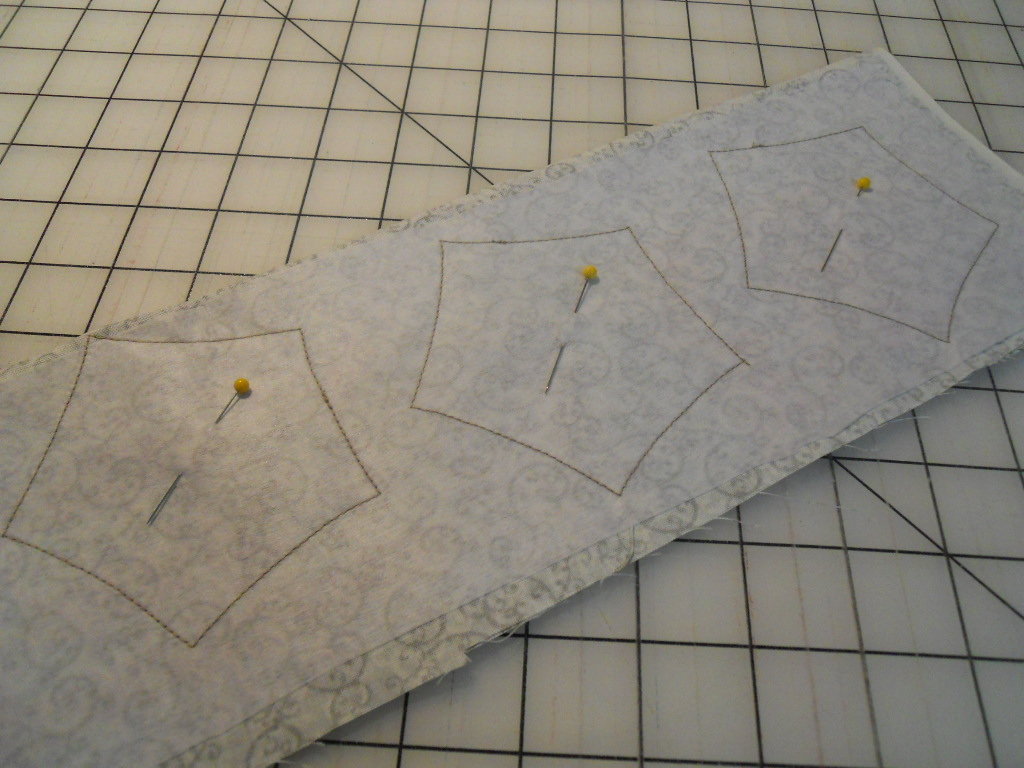
Now back to those prairie points for the edges.  I get asked often how to make prairie points, so here you go:  Fold a square (in this case 3 inches) in half point to point to make a triangle and press with a hot iron. 

Then fold it again, and press it again ~ I use a squirt of starch or sizing at this press to help hold the shape while you work with it.  Voila, you have a prairie point!

Working on just one side at a time, line them up along the edge of the front, having each prairie point "eat" the next one with an overlap of about a quarter of an inch.  Don't over think this ~ it's not rocket science, if someone ever tells you your prairie points aren't even, then don't let them use your pillow! 

None of these measurements have to be exact, (unless you plan to enter in a major juried quilt show), for this type of project it's ok to just play with the placement and color arrangement a little and then pin them in place (I use one pin for each prairie point). 

Sew with a scant quarter inch seam allowance to hold them in place.  Tip: use a seam ripper or stiletto to stabilize the overlap spot as you approach and sew it. 

Then I added an envelope style back to it as with any pillow, turned it right side out, pulled all the points completly out, and added a pillow form.  Now it's sitting on the little bed in my sewing room making me happy every time I enter ~ and the pillow cover is now for sale in my etsy store :)

To view all of the Challenge One projects for the kick off of Project Quilting Season Two, check out Kim's blog.  While you're there, cast a vote for your favorite, and leave a comment to be entered in a give away!

Enjoy the day!
~ Dawn

Friday, January 14, 2011

Inspirations from the Past

I've been having fun making pinwheels lately.  Here is a little sneak peek of one of my large pinwheel blocks that have been keeping me busy ~ I'll show you the whole quilt sometime soon when I'm allowed :)

My modern day pinwheels that I've been making are inspired by an heirloom quilt top that I own.  I came across this antique feedsack quilt top literally in a pile in an old shop one day, and I decided it needed to come home to my house with me. 

The maker never finished this top into a quilt.  Perhaps life got in the way, and she put it aside...never getting back to finishing it, or maybe the fact that it doesn't lay completely flat discouraged her from tackling the quilting.  Both things that I can relate to, and feel a little connected to this quilter from the past.  At any rate, besides the really nice colors in this quilt, I like that it's a bit wonky, and very un-pretentious...

I like how the triangle prints are pieced to get the most out of every scrap of fabric (you can click on the picture for a more close up view). 

And on many of the heavy weight background pieces, you can still see the printing from the sacks that were cut up to become pieces of the quilt.  If it was finished, I wouldn't have the great view of this on the back side of the blocks.  I don't know if this was someone's first attempt at quilting ~ and perhaps even her last, or if this was just one insignificant piece in the body of one person's work.  But something made her hold on to it, and not toss it out.  Somehow it was kept to be passed down for someone else to appreciate.  True treasures are not always prestine and perfect...sometimes it's just about the simple art of the pieced quilt. 

Enjoy the day,
~ Dawn

Tuesday, January 11, 2011

A Love of Cross Stitch Lives On

Yesterday while out running errands with Heather, she asked if we could make a quick stop at Joann's because she needed a couple skeins of floss to finish up the cross stitch project she has been working on. 

The neat thing about that was that she's almost finished with this sampler.  I used to cross stitch a lot, and had started this project years ago.  I had only gotten a little bit of the center of this project done, and then I got busy working in a quilt shop...

So along came my Heather to the rescue, who has a natural talent with needle arts.  She had been doing punchneedle projects (including the punchneedle center for the sample of my Snowflake Punchneedle Pillow that's in the current issue of Create & Decorate Magazine), and she had made several previous cross stitch projects for gifts.  

Heather took over my fledgling cross stitch UFO and is almost finished!  I can't wait to see it all done.  I love samplers, and the cool folk art whimsy of this pattern.  Some time soon, I'll show it to you all finished and framed :)  Thanks Heather!

Enjoy the day!
~ Dawn

Monday, January 10, 2011

Project Quilting Season Two Begins!

Tonight I was browsing the blogs that I read, and what popped up, but a picture of my Logs quilt on Kim's Fabric Fascination blog :)  Kim was announcing the beginning of Season 2 of Project Quilting that just started yesterday.  I have an idea of a project that I'd like to make by the deadline of noon on this coming Sunday, but we'll see if I can get to it as I have a couple of other deadlines that I'm working on this week as well.
 
Season One of Project Quilting was a blast.  This is a collage from Kim's Crafty Apple consisting of one project from each of the 25 people who participated in Season One.  You can find it, and more information on Project Quilting and Season Two here on Kim's Crafty Apple blog.  There is still plenty of time to get in on this week's challenge...and if you can participate in any of the challenges, I strongly recommend it ~ I found the challenge to be really fun and a cool way to spark creativity.  I can't wait to see what everyone comes up with this season :)

Enjoy the day!
~ Dawn
 

Wednesday, January 5, 2011

A Little Back Basting Progress

Here's a little progress report on the hand applique that I've been working on lately.  I've been putting time in on it in the evenings when watching TV. 

 I have the green finished!

It's going to be a reproduction of one of the corner blocks for the Lady of Victory Quilt for the Baltimore Applique Society.  Now I just have to do the red half.

I'm using Back Basting ~ one of my favorite methods of hand applique.  It works great to position my leaves in the proper place to each other.  To do Back Basting first I marked the pattern in reverse on the back side of my block's background fabric.  I used a blue water soluble marker to mark mine (pencil works too, but I find that the blue shows up really well and rinses out completely).  I placed the red fabric face-up on the front of the block covering over the shape to be appliqued and lightly pinned it to keep it from shifting around. 

Then using a large darning needle, and thick quilting thread I ran basting stitches all around the the outline of my shape to be appliqued. 

From the front you can see the outline of the shape to be appliqued created by my basting stitches.  Then I removed the pins, and the piece is very easy to handle and portable.  Letting the block sit over night before doing any work on it, helps the holes that I made with the basting set up well to create a nice "perforation" where I will turn the edges under, and aides with the needle turn. 

Additionally, I like to take a chalk pencil and run an outline just outside of the basted lines ~ this is optional but it helps me see the stitches.  Finally the piece is ready to needle turn.  I cut away the red fabric as I go leaving just a little edge to turn under, snip the basting stitches and pull out a little at a time, and needle turn along where the basting stitches were.  That's the gist of how to do Back Basting.  It's coming along well, I'll show you some photos of my Red progress soon :)

Enjoy the day!
~ Dawn

Saturday, January 1, 2011

Cutting Right Into the New Year!

Happy New Year!  It seems I've taken a two week "computer sabbatical" ~ I did hop on the computer and check Facebook occasionally (and touched base with my stores of course), but for the most part I kept the little bugger completely turned off throughout the Holidays...and it was decadent!

Now after two weeks of worshiping, playing, cooking, eating, unwrapping, toasting, and all around celebrating I'm feeling fresh and ready to put the nose back to the ole grind stone :) 


I did do some designing during my down time, and these are some piles of fabrics that I've received from Red Rooster Fabrics for two upcoming projects for Quilt Magazine.  The first pile is a happy collection called Lil Miss Cutie Patootie Springtime, and the second is a reproduction group called Elm Creek Quilts Anneke's Collection.  I'm cutting into them now, and will be sewing away with them the next few weeks, I'll post some little sneak peeks as I can :)

And tonight I'm enjoying some bean soup, and hand applique time in my easy chair. (I'm working on a block for the Baltimore Applique Society that I hope to have finished by the meeting the third week of this month ~ more on that soon!) I'd love to hear what you are working on in the New Year!

In the meantime...
"Be always at war with your vices, at peace with your neighbors, and let each new year find you a better man."  ~Benjamin Franklin       My very favorite New Year quote :)

Wishing You a Happy and Healthy 2011!
~ Dawn